
2,556 words
14 minutes read time
**This is a short tutorial on how to make a simple floral cover, full paperback wrap in Canva.
I have Canva Pro and use elements from that plan. I’m not sure what’s available in the free plan, but I’m hoping you can find comparable elements so you can also make your own covers if you ever want or need to. I also source my stock photos from DepositPhotos. You can use photos from wherever you want, but because they’ll be going on a book cover, I wouldn’t use free stock photos from places like Unsplash or Pexels. If KDP happen to ask you for copyright proof, they do not accept Canva’s copyright agreement if you use their stock photos, so always be safe and buy the stock photos you’re going to use on your books. Elements are fine to use as long as you’re not attempting to use one element for the entire cover. Here’s Canva’s licensing agreement FAQs if you want to look them over: https://www.canva.com/licensing-explained/ There’s a lot of incorrect information out there. Don’t be afraid to use Canva. Just be smart when you do.
I’m a broke and impatient author. And when it comes to publishing, I know many authors are just as broke and impatient as I am. Meaning they can’t afford to hire out but don’t want to wait to publish while they save. Maybe they don’t even have money to save, if they live paycheck to paycheck like I do.
I’ve done my own covers, for good or for ill, for many, many years. Every year I get a little better, or maybe stock photo choices get better, or maybe I stumble upon a male model that hasn’t been used to death. I’m especially proud of the covers for Wicked Games and A Heartache for Christmas. Loss and Damages is fine too, but I didn’t need nearly the luck that helped me put Wicked Games and A Heartache for Christmas together.
But I know that not every romance author wants to use men on their covers. What’s popular will come and go, and if I do come across a male model on a published book these days, a lot of the time he’s AI generated. I don’t want to use AI to make my covers. I want to pay photographers and models. Maybe they’re living paycheck to paycheck too. Anyway, right now I see a lot of illustrated covers, but I don’t plan on using one for my books anytime soon. Florals or object covers seem pretty versatile, and not even just for dark romance. I think some authors still use them for discreet paperbacks while using a shirtless male model for the ebook, but I’m actually seeing less and less of that. I’m not sure if it’s cost or if it’s just a trend that’s fading, but I’m glad. I never liked it and never did it myself. (Be proud of your men! LOL)
If you don’t have a lot of skill, you have to keep two things in mind when doing your own covers: choosing the right stock photo and what font you use. Those two things will make or break your cover because you won’t be able to use the skill you don’t have to make the stock photo better than it is or twist it to suit your needs, and font is the finishing touch, like a pretty bow on a present. So it’s really important that you know what you want and that what you want matches your skill level or you’ll just end up frustrated. It’s not much different from crafting the perfect scene in your head and then sitting down to write and forgetting the alphabet.
The first thing I would do is clock your genre. What your genre is and what kinds of covers are selling right now. It doesn’t hurt to take a look at the top 100 on Amazon in your genre not only for inspiration but to remember their readers will be your readers and you want to blend in. Then look at the author. If it’s a big name author like Colleen Hoover, looking at her covers probably won’t do you too much good. She sells with her name, not her covers. Same with some of the bigger indies, or indies who have picked up book deals. They already have a fan base and can get thousands of pre-orders without even having a cover yet. The midlist author who’s making a good living but not well-known enough to have name recognition will be your best bet.
That said, let’s figure out what the book is about. Maybe an enemies to lovers. Something that would fit a simple floral cover. We aren’t going to get too crazy because the purpose of a “simple” cover is to a) still be good enough to keep because you’re stubborn like I am and want to do it yourself or b) stay as a placeholder until you can afford something better if that’s what you want. You may always do your own covers and swap this one out as your skills get better. So, maybe a romance that would fit a dark floral cover. A standalone, possibly, but if you’re writing a series, finding similar stock photos for other books wouldn’t be too hard. Once you get into the right search, you can find a lot of similar pictures on DepositPhotos.
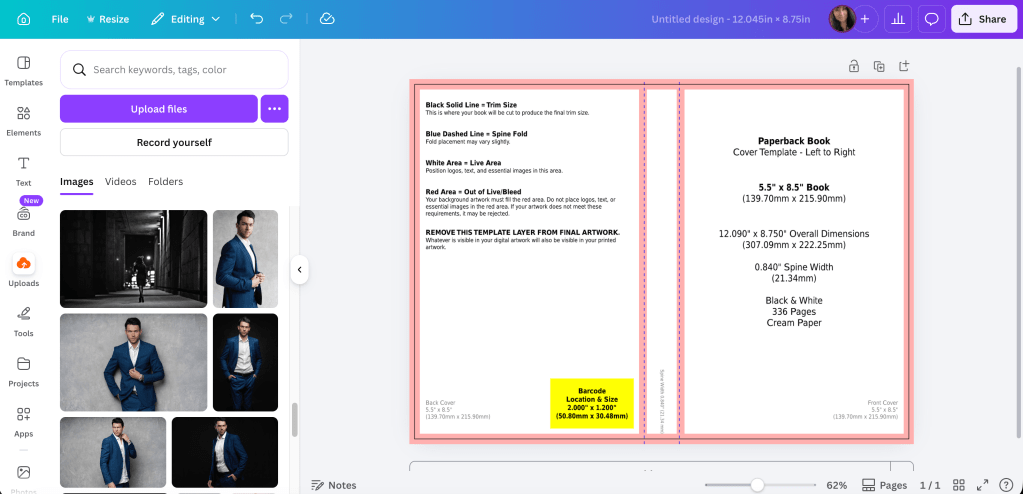
Let’s start with a blank template. We’ll do the full wrap since it’s easier to design the whole thing at once. I’m using Canva Pro, but because you’ll be using stock from a site like DepositPhotos and a font from somewhere like Creative Fabrica or a free source like 1001 Fonts, you can probably do your cover just fine with the free plan. If you don’t know how to get here, I have the instructions in a different post.
Next, go through photos on your stock photo site. I buy packages from App Sumo for DepositPhotos so that’s where I’ll always source my stock photos. What you’re looking for is something that will give you room for a title, maybe a series logo if you want. Also your author name. If you take a look at other floral covers, you can pick them apart and see what they have that’s similar. Before spending the money or credits on the photos, you can download the sample or use a screenshot of the picture first to try it. Then if you know for sure that you’re going to use it, you can buy it.

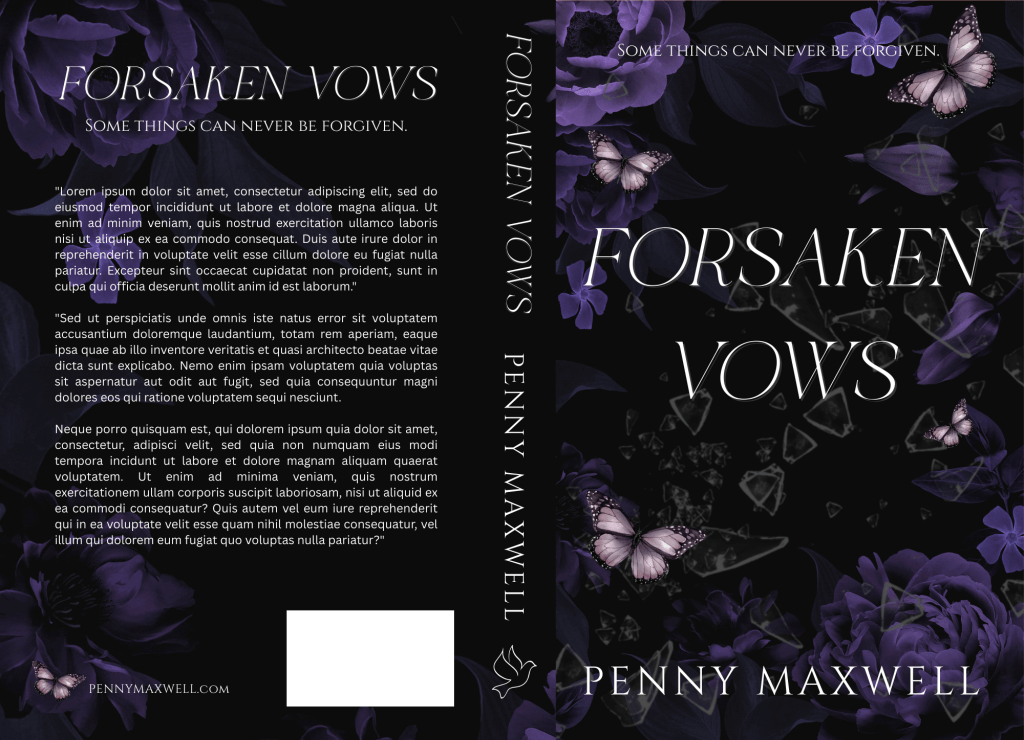
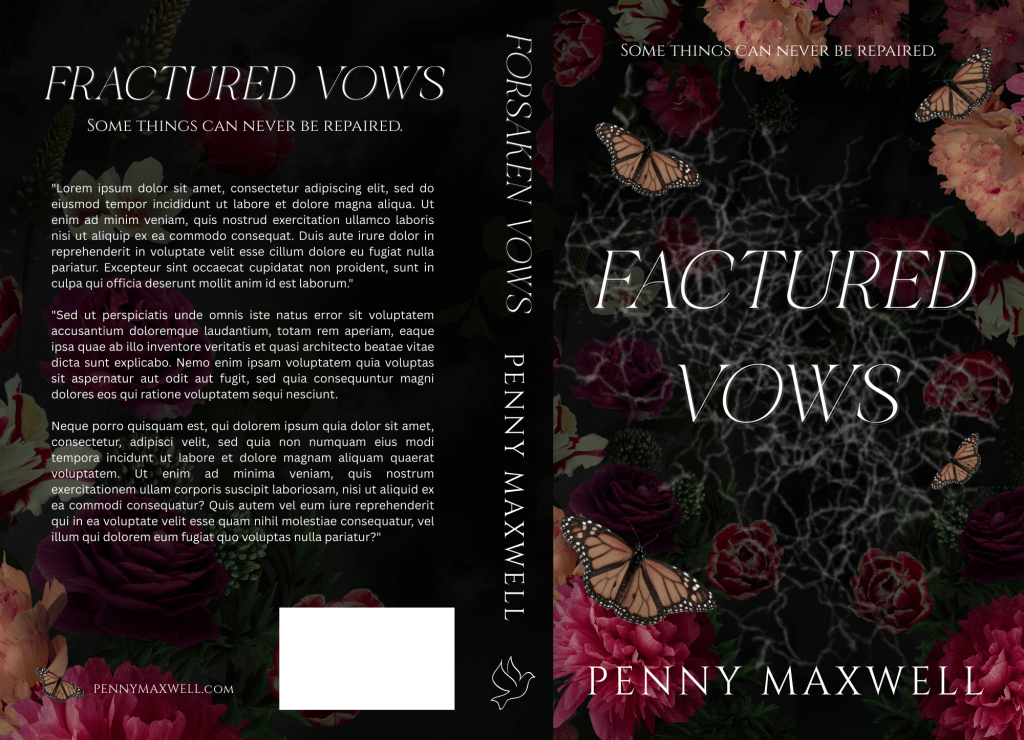
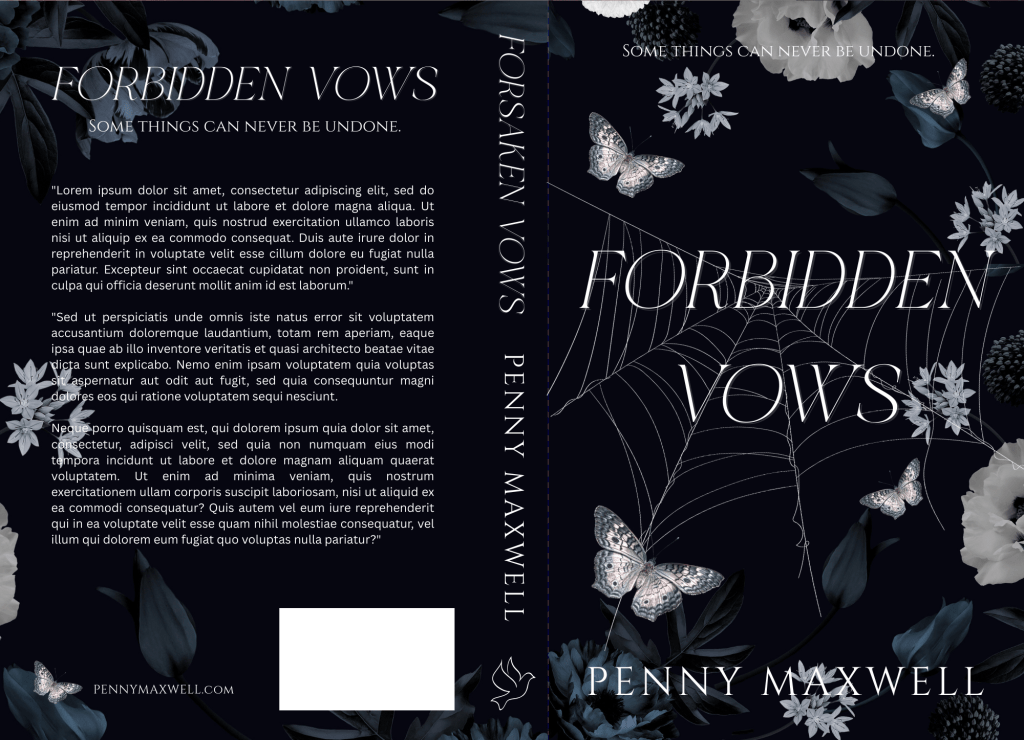
I chose some dark purple flowers. (I’ll link the photos below so you can find them easily if you want.) I like how they’re positioned. I don’t have to worry about making room in the middle for the title. They are a little dark though, so play with the brightness of your photos. You should bring out the color a little bit because when you print through KDP, their paperbacks are always darker than what you see on your screen.
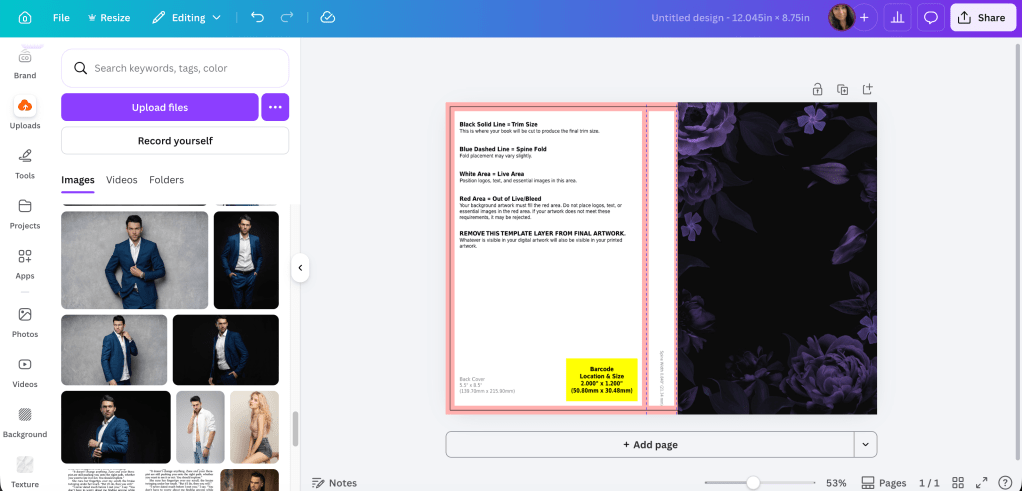
Okay, I brightened it up. You might not be able to tell I did much, but always do enough so you like it, and always order a proof. You’ll probably need to adjust the colors again once you see it in person.
If you wanted to add texture like broken glass to the middle now would be the time. I’m not quite sure if it really needs it, but let me play and see what I can come up with. I wouldn’t bother using more stock for this. Canva will have something that will work and using their elements on your book cover is okay. It will barely be detectable, but it’s the little things like that that separate something that looks DIY from something that borders on professional.
I was able to find some broken glass in Elements that fit nicely since they were already on a transparent background:
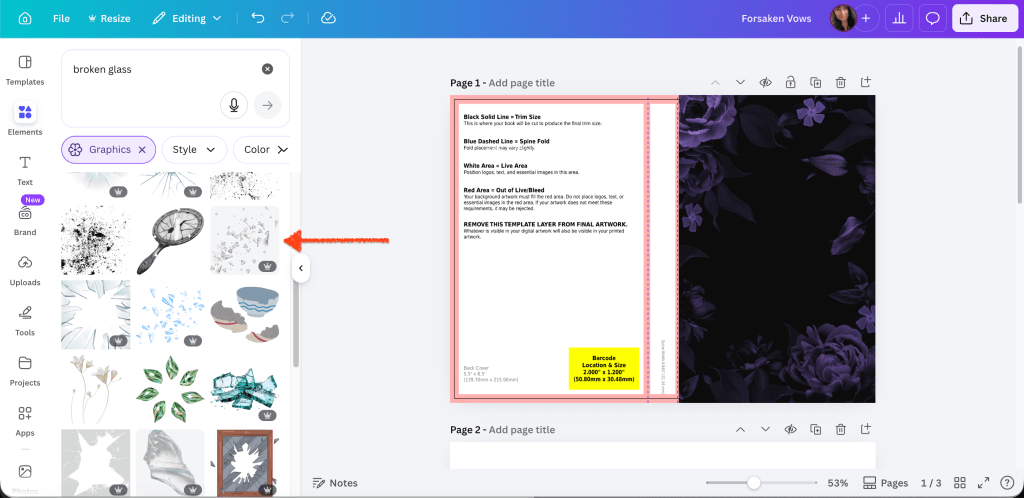
Position the glass where you want it. Remember you can play with photo by making it bigger or moving it around so you can put the glass shards where you want them to go.
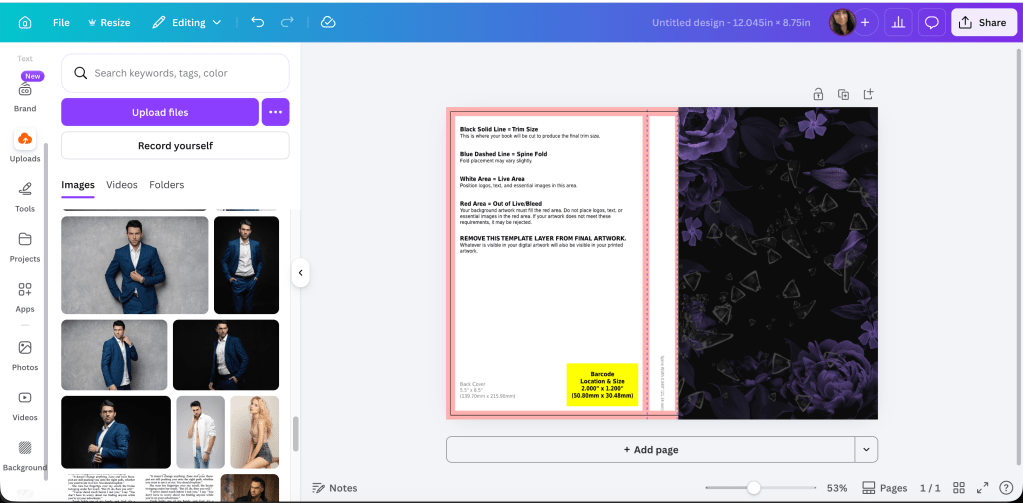
Now that we have a “base,” if you wanted to add things that pertain to your book, you can discreetly put those in. Rings or strings of pearls. Ribbons. Whatever. I’ve seen a lot of covers with butterflies, though I have no idea what they represent. Innocence, maybe. I found one style I liked in Elements and messed with their color a bit to make them blend in.
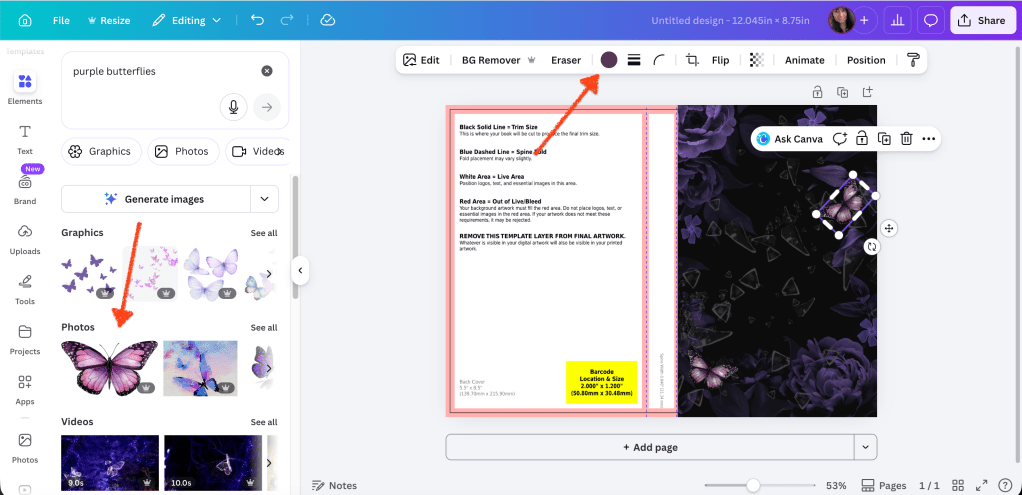
I don’t want to add too much, so the glass and the butterflies will do for me. Part of learning how to design covers is experimenting, so just keep at it until you find what you like. When you don’t know what you’re doing or haven’t developed your eye yet, simpler is always best. It’s really easy to add too much then it looks like Canva threw up all over your cover.
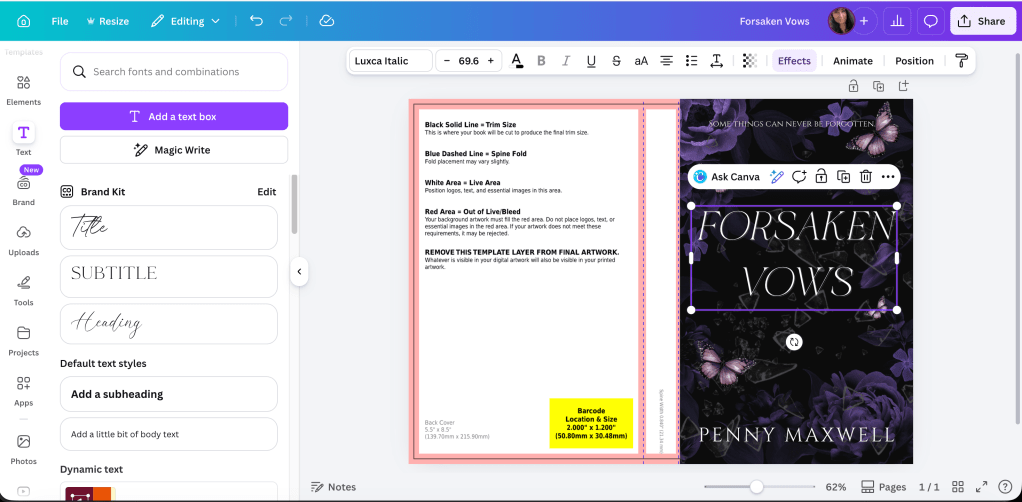
Now we can have fun with font. A bad font can ruin your cover. I’ve seen beautiful art, and a cover just isn’t the same if you can’t find something that will complement the illustration or stock photo and the book as a whole. I think for this one, rather than edgy, we’ll go with elegant. There aren’t any skulls or anything here, so let’s stick with something pretty. I get my fonts from a combination of places. Sometimes I use Canva’s, sometimes I buy from Creative Fabrica. Sometimes I use 1001 Fonts depending on if what I like is available for commercial use (sometimes they’re tagged as personal only). There are lots of places to get fonts. It doesn’t matter where you get them as long as they’re available for commercial use.
For this one, I went through a few before I found one I liked. It’s called Luxca Italica and it came with a bundle I downloaded from Creative Fabrica. The font for the tagline and Penny’s name is Cinzel. I think you can get that anywhere. I’ve read that you shouldn’t use more than three different fonts on your cover. I like to stick with two if at all possible. But I can understand if you need a clear font for the tagline, then your pretty font for the title, and then whatever you use your author name. I use the same font on all my books for brand awareness.
What this means, though, is that since we’re doing simple, that if you found the fonts you like, then you’re done with the front cover. Now we can do the spine and the back.
The back cover graphic will mirror your front, but you probably don’t need to copy it exactly. Especially since you want people to be able to read the blurb you’re going to put back there. What I did was duplicate the flower picture but then cropped it and made it fit the rest of the template. That way there will be plenty of black space for the words.
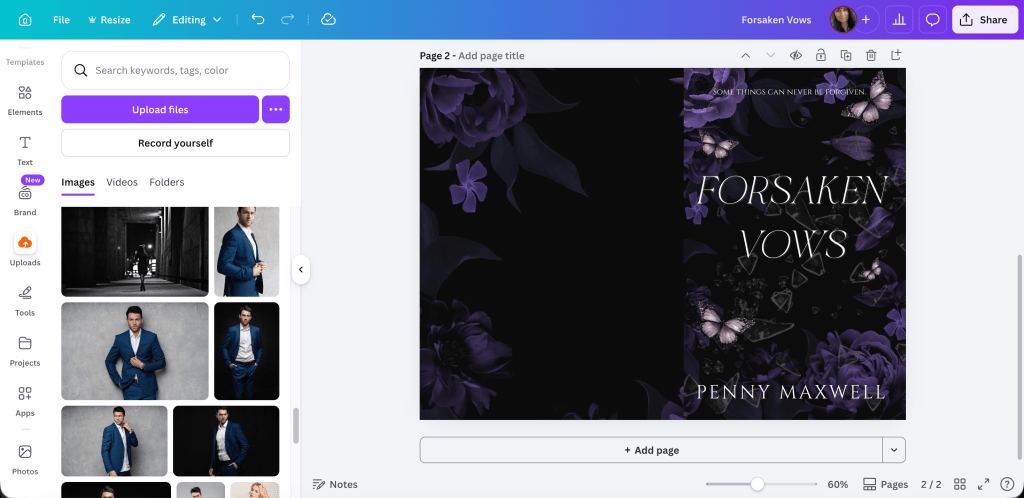
Lower the transparency so you can fit the title and author name on the spine. The orange lines are the bleed lines. Don’t get too close to those. I also chose a dove just as a filler in case you have an imprint logo that you use.
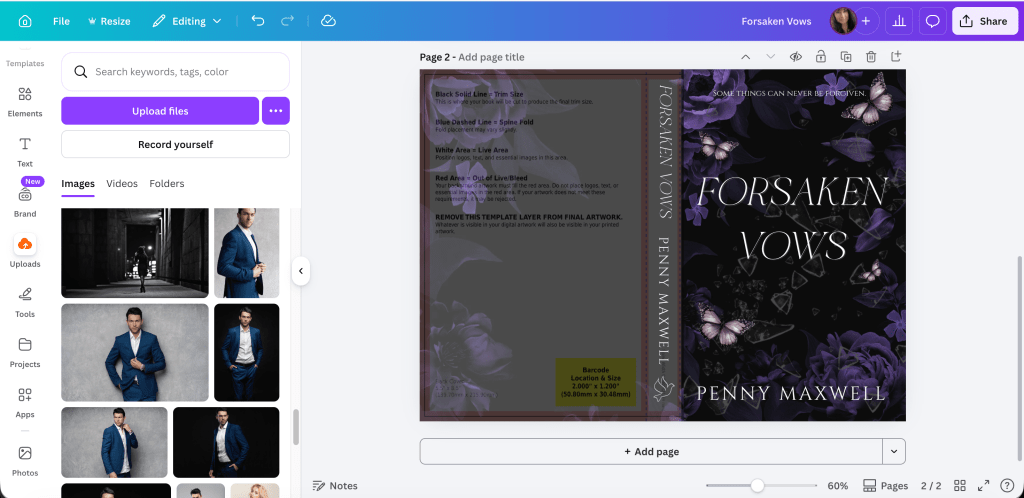
Keep the transparency low so you can center your blurb. You don’t have to put the white rectangle over the yellow one if you don’t want to. KDP and Ingram Spark will fill that space in with the barcode. If you’re using your Ingram cover for Draft2Digital, they don’t like the white rectangle and will kick your cover back to you anyway.
I never know what to put in the lower left, so most of the time now I just add my author website. It seems to work okay. For this one, I added a butterfly that matched the front cover.
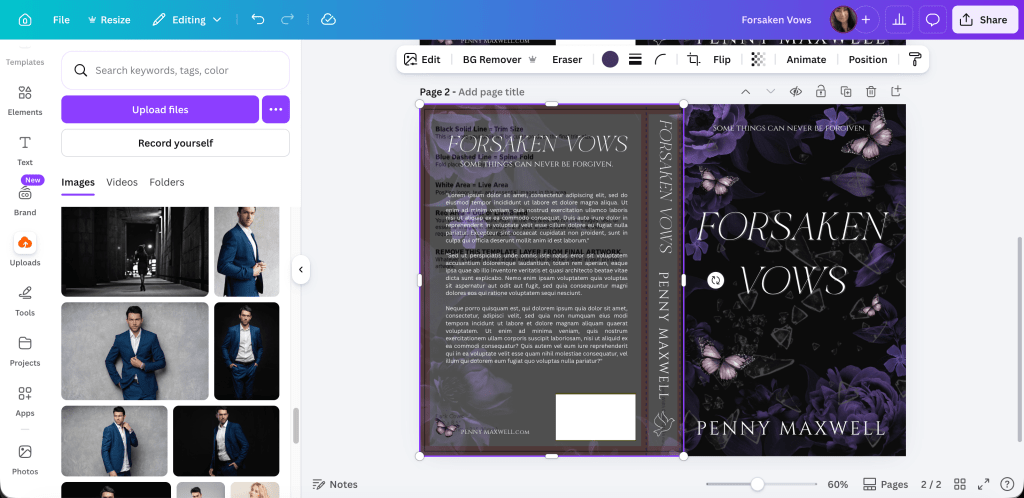
Now you can remove the transparency and look at the cover as whole.
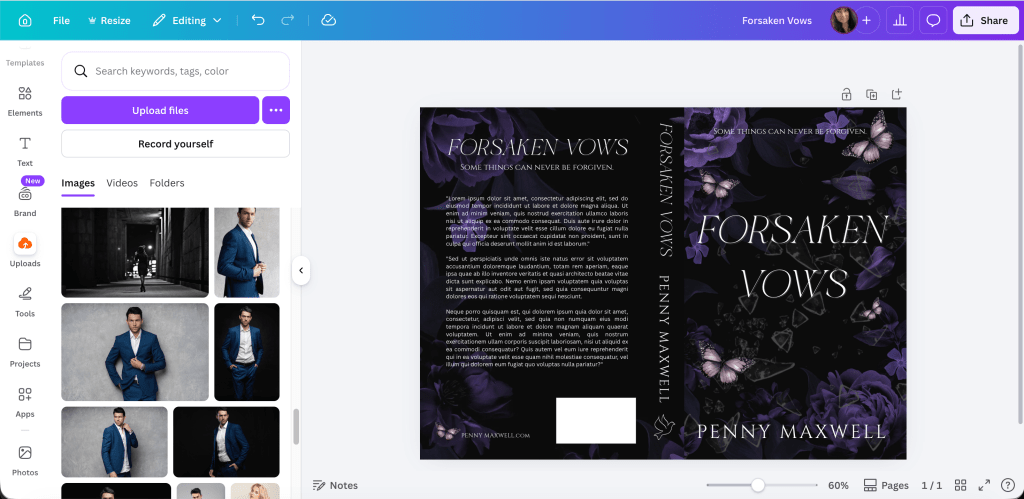
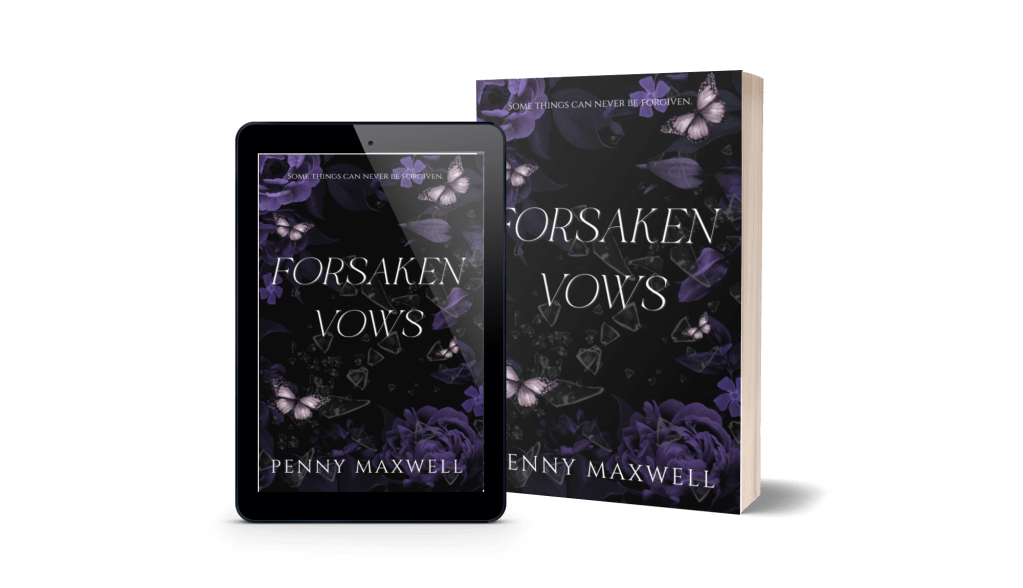
If you’re not sure how it will look as an ebook cover or in promos, take a screenshot of the front cover and use a site like this one: https://diybookcovers.com/3Dmockups/#
I think it looks really good, actually. Not bad for something I put together in a few minutes for not much money. The title font is clean and what we added to the flowers (glass and butterflies) doesn’t clutter.
Now that you have a template of sorts, you can make covers for a series if that’s what you’re planning. I write all my books in a series first and design their covers at the same time.
This could be a trilogy:
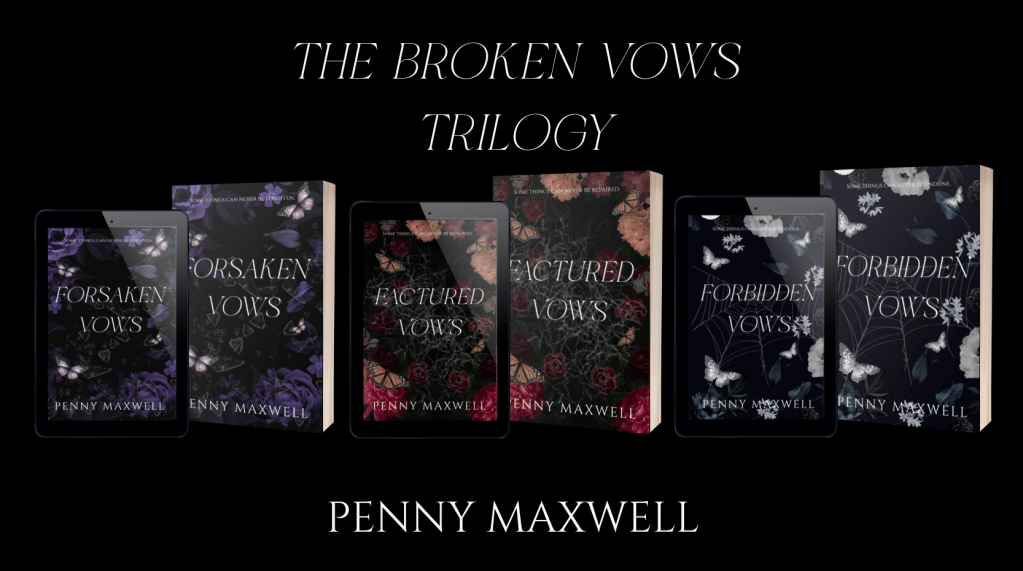
And here they are up close if you want to study them:
Here is the TL;DR of the post:
1. Look for flower graphics that have an empty middle for extra elements and title. You can start here if you purchase on DepositPhotos: https://depositphotos.com/similar-images/794277310.html
And here are the links for the individual photos:
Purple: https://depositphotos.com/photo/luxurious-blooming-garden-flowers-black-background-beautiful-peonies-bouquet-plum-799937840.html
Orange and red: https://depositphotos.com/photo/vintage-floral-card-garden-flowers-peonies-roses-tulips-rhododendron-leaves-521122292.html
Navy blue and white: https://depositphotos.com/photo/navy-blue-white-peonies-assorted-flowers-full-bloom-floral-gothic-797688972.html
2. If you’re doing a series, plan your theme. The middle elements for these books are: broken glass, shattered ice, and spider web. Keep extra elements the same as well. I chose butterflies but picked colors that blended in with the flowers. If you want to go creepier, you can do moths, insects, or birds.
3. Don’t be afraid to experiment and adjust your stock photos. Move the flower pictures around to position them in the way you want. You can even crop and just add only sections of the pictures. With the black backgrounds, as long as you’re not cutting off flowers mid-petal, you won’t be able to tell. Also colors. I changed the colors of all three butterflies. To make the black spider web pop against the already black background, I inverted the colors (an option in the edit menu when the photo is selected) and turned the black web white. Voilà.
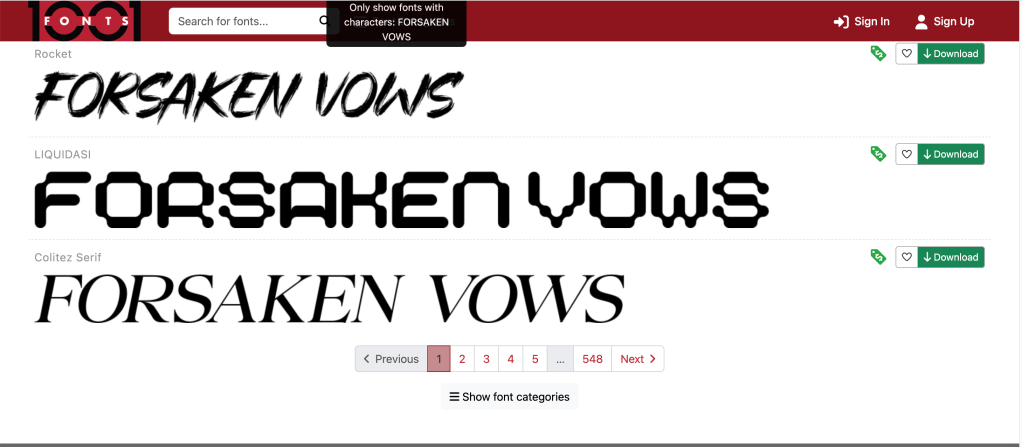
4. Take your time choosing the font. I went through about twenty fonts before I chose. Just click down your list to see which one looks best. If you don’t have very many, 1001 Fonts that I linked to above lets you try out your title before you download it. Colitez Serif looks like it would be a nice fit too, and it’s free for commercial use.
5. Remember to look at what’s selling in your genre now. Covers with men on them are really easy to create too, easier than floral covers. So even though cover trends change, it helps to know what’s selling at the moment.
6. Test and get feedback. Adjust if you have to. Maybe the photo isn’t right. Maybe you need to pick a different element for the middle.
7. Keep it simple. One or two elements and three fonts maximum. If you haven’t developed your eye, it’s easy to bog down your cover.
I hope this blog post helped you a little, or at least inspires you to try your own floral covers.
Good luck!
Quick Links:
My Canva full paperback wrap tutorial: https://vaniamargene.com/2022/06/13/updated-creating-a-full-wrap-paperback-book-cover-using-canva-plus-more-screenshots/
How to make an ebook cover from your full paperback wrap: https://vaniamargene.com/2024/09/09/how-to-turn-your-books-cover-full-wrap-pdf-into-an-ebook-cover/
Creative Fabrica for fonts: https://www.creativefabrica.com/
1001 Fonts: https://www.1001fonts.com/free-for-commercial-use-fonts.html
The DIY book cover mock up generator by Derek Murphy: https://diybookcovers.com/3Dmockups/
Discover more from Vania Margene Rheault
Subscribe to get the latest posts sent to your email.

