
If you don’t want to format yourself, yet you don’t want to have to pay too much, then there aren’t many things you can do.
Let’s start with Kindle, since more than likely 100% of you will publish on Amazon through KDP. What are your options if you don’t want to format your file for Kindle?
1. Actually, just format it, FFS. It’s easy. I pulled this out of an old blog post I did last year. Some of the info isn’t correct anymore, but you can still take a look at it here.
First, make a copy of your manuscript (just in case something goes wrong). This one shouldn’t have any headers or footers. If you have page numbers and/or a don’t steal my shit copyright header for your beta readers, remove them all.
The biggest thing with conversion is Tabs will screw everything up. If you use the Tab key to make your indents for your paragraphs, you’re going to have one messed up converted file. Here are the steps to take out your Tabs:
Removing Tabs
Press the Paragraph Show/Hide button in the Paragraph section of the Home tab so you can see the formatting marks.
Highlight (select) your whole document.
At the far right of the Home tab in the Editing section, click on the Replace button.
Click the More/Special button in the bottom left corner of the box.
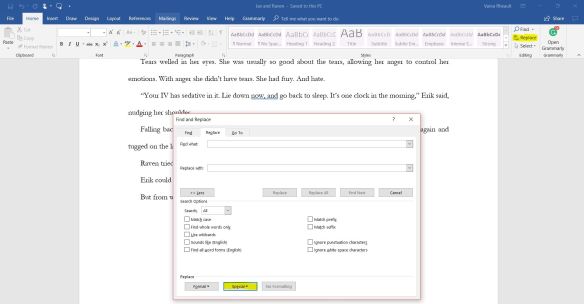
Select the Tab Character.

Leave the Replace with field empty and click Replace All. This removes all the Tabs.
This should have taken them out. If, for some reason, you used the Spacebar to make a tab, go into Replace, and in the Find field hit the number of times you used the Spacebar to make the Tab (maybe five? Six?), leave the Replace line empty and hopefully Word will find all the Spacebar spaces you used for tabs and pull them out.
But now you have a whole book that doesn’t have any indentations. I’ve seen books like this. Don’t do it. You want your book to look as professional as possible so put them back in:
Putting your Tabs Back In
Again, select or highlight your whole document.
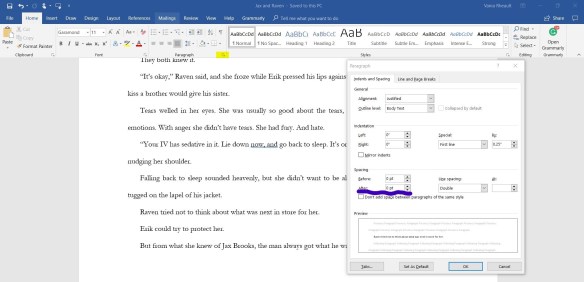
Click the little arrow at the bottom right of the Paragraph menu in the Home tab. Or right-click your mouse and select Paragraph from the menu.
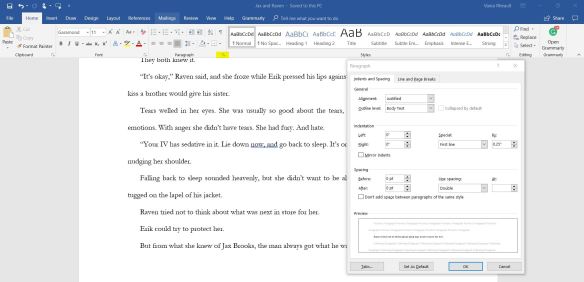
In the Indentation section of the box change Special to First Line and enter 0.25. This is how long your Tab is going to be. If you want it shorter you can do 0.23 or something. I use 0.25.
Click OK.
This puts all the Tabs back into your document, but you don’t want the first paragraph of your Chapters and/or scenes to be indented (traditionally published books usually do not have the first paragraph of Chapters or scenes indented) so you will have to go through your whole novel(la), look for the Chapter starts and scene breaks and take the tab out of the first paragraph. When you find those, put your cursor in front of the first letter of the first word, right click your mouse, select Paragraph and in the Indentation section, change By to 0. This will manually take the one Tab out.
When you start a new document, it’s easier to go into Paragraph, change First Line to 0.25 from the beginning, then you don’t have to go through all this after you’re done. It will take a little getting used to, to not have to hit the Tab button at the beginning of every new paragraph, but it will be worth it in the long run.
KDP Formatting Instructions at a Glance:
Take out all the Tabs, put them back in with the instructions above. Don’t indent Chapter starts. First paragraphs after scene breaks have started to become optional.
If there is any in your document, remove headers, footers, and page numbers.
Use a common font. I use Georgia for my Kindle, Garamond for the paperback.
Drop caps are not e-reader friendly, at least not in my experience, and I don’t have enough patience to make them work. Remove those as they will probably mess up your paragraph during conversion.
Set your margins to .5 all around–top, bottom, left, right.
Set your line spacing to 1.5. Not single, not double.
Select your all your text and set to Full Justified.
Don’t use a bunch of Hard Enters to make new pages. Please insert page breaks to create new pages. Lots of hard enters will not convert well. Insert page breaks after you Title Page, Copyright page, dedication page, acknowledgments, Table of Contents, and after each Chapter End. Use them to separate your back matter from your author page.

If you have spaces between your paragraphs, you’ll need to select your file again, go into Paragraph and change After in Spacing to 0 pt. This takes out all the unnecessary spacing between paragraphs. (You will want to do this so you are not accused of making your book longer for the extra KU page reads.)
To add your website or author page in the back, say, on your author page, use https:// with the rest of the website in the link.
What you’ve done is made your file as simple as possible. If you have graphics or formulas or are publishing a nonfiction book with all the bells and whistles, then I would suggest buying a book or researching how to format a complicated document. These instructions are for a fiction book with the general front matter and back matter only.
If you follow those guidelines for your Word document, you should be good to go conversion-wise. But if you don’t even want to do that then you can:
2. Use Kindle Create to format your file. The file won’t belong to you–you format it and then publish right to KDP. So you wouldn’t be able to use the file for other platforms like Apple Books or Kobo. But if you all want to do is publish to Amazon, download the App, upload your book into it and just fiddle with it until you like what you see. Watch the videos to learn how. I played around with it, and I formatted a 50,000-word book in an hour. Look here for details.
3. Use a template. The templates are already set so all you do is copy and paste your document into it. Most of these cost money, so look at these at your own discretion. You can start here: Beautiful Templates for Book Design Success
4. Draft2Digital says they’ll let you format your book on their site for free, and let you use that file wherever you want. You can even use them just to make a file for Kindle. You don’t have to go wide to use their free services. I haven’t ever tried them simply because once you get down how to format a file for Kindle, you don’t need anyone’s help. But if you just want to upload your document into D2D after you create an account, give it a try.
5. Buy a Mac and buy Vellum. I hear Vellum is the best at formatting e-books and paperbacks. I don’t have a Mac but I plan to treat myself this summer so I can buy Vellum (although, if it’s as good as I hear, I’ll be tempted to redo all my books). If you don’t have a Mac or Vellum, and can’t afford either one, maybe you can ask someone who does to format for you. Maybe offer to trade for the favor. You never know.
6. I also hear Scrivener has formatting capabilities. I don’t use it–I write in Word. But if you use Scrivener, you can try it and see how you like it.
You’ll note that I don’t have the instructions on how to put a Table of Contents in your file. I think they are stupid for fiction. But that’s just my opinion and not a very popular one at that. If you want to know how to make a clickable ToC for your e-reader file, read the instructions I had to hunt down when I made a box-set for Summer Secrets a couple months ago.
Formatting your paperback is a bit harder.
1. I will always recommend using an interior template from CreateSpace or KDP Print. These templates are the same, you just download them from different websites. Choose the formatted template which has all the headers, footers, and end sections in place so your page numbers and your author name and book’s title are on the pages they are supposed to be on. If you take a look at any trad-pubbed book, you’ll see there aren’t headers on Chapter start pages, or headers or footers on front matter or back matter. The interior templates takes care of most of this for you. The only issue I had with them at all is that I usually have more chapters than the template allows, so I have to monkey with the end section breaks myself to create more chapters. Most of the time I just copy and paste the section end break of a previous chapter into the end of the next chapter and that works for me. If you have any working knowledge of Word at all, you should be able to do this without any hassles. The front matter and back matter is all laid out for you as well, so just copy and paste page by page, or chapter by chapter. The template is “chunked” meaning you can’t copy and paste your whole document into the template at one time. The chapters and front and back matter are broken up by section end breaks.
Have patience. If you do 98% of the work, I’m willing to bet you have a friend who would look it over and do the other 2% if you just can’t get it right.
2. If you don’t want to go this route, I’m afraid there isn’t much you can do for free besides get a very good working knowledge of Word and start from scratch to do it all yourself. I took a college class in Word, and I still couldn’t do my formatting without at least getting a good start with the template. But you can always look for a paid template. Most websites that sell e-reader templates sell interiors for paperbacks too.
3. Pay for a formatter. Reedsy has freelance interior design recommendations. They maybe be a bit expensive–that’s my guess just by looking at their qualifications. Fiverr pulled up a lot of options for interior formatting as well, and what I saw were reasonably priced. Of course, always ask for referrals, or other books they’ve done to get an idea of how their books look.
As always, I recommend learning how to do this yourself. If you’re going to be a prolific writer, or even if you’re just going to write a book or two a year, you might as well learn how to do it. Hey, you might even get good at it and you can trade services with other people. That’s what the writing community is all about: I’ll scratch your back if you scratch mine. If you can format for someone, maybe they’ll beta read for you, etc.
I know there’s stuff I’m forgetting. I mentioned Draft2Digital but not Smashwords. If you want to publish through Smashwords, they have their own system, and I’ve read their how-to-format-your-file book so that it will convert through their “meatgrinder” process. I’ve never published through them, so if you’re interested, here is their STYLEGUIDE that will help you format your file to upload to Smashwords. It’s long, but Mark Coker makes it funny, so there is that.
When I first started formatting, it was a lot of trial and error. Make use of the interior viewer on KDP, KDP Print, and CreateSpace. Trust me when I say what you see is what you’ll get. If you get caught in an upload, fix, upload, fix, upload, fix, upload, fix pattern and you feel like you’re going to go mad, take a step back, go outside and come back later with a clear head. There is nothing worse than trying to format when you are quivering with rage.
Try practicing on short stories or novella. It’s a lot easier to work with few words then build up to a complete MS when you kind of know what’s going on.
I hope this blog post helps you format!
Good luck!
Up next is cover design!
Thanks for reading.
Discover more from Vania Margene Rheault
Subscribe to get the latest posts sent to your email.


Pingback: Author Interview with Daniel Mattia, Author of Debut Novella In Crows’ Claws | Vania Margene Rheault