Because KDP updated their template, this post no longer has the correct information in it. There are still a lot of good tips if you want to read through, but if you’re just interested in CANVAS SIZE for Canva, you can read my updated blog post here. Thanks!
https://vaniamargene.com/2022/06/13/updated-creating-a-full-wrap-paperback-book-cover-using-canva-plus-more-screenshots/
I’ve come across this question a lot these days, mostly I think because a lot of authors use Canva for their ebook covers and graphics for promos. Some bloggers have compared Canva to Book Brush, and while Book Brush can do many things Canva can’t, I feel that Canva is more versatile and I prefer to use it over Book Brush. Especially since Book Brush is more expensive and if you already pay for Canva Pro, you’re not looking to plop down another $146 (for their popular package) a year on another program.
I’ve never made a full wrap in Book Brush, though it is a feature they have available in their paid plans. I made my first paperback wrap in Canva not even knowing if it was possible. It was the old cover for Wherever He Goes and it was a complete experiment applying what I knew from making covers in Word before I knew Canva existed. I ordered a proof not knowing what to expect, but the cover came out beautifully, and since then I’ve done all my wraps in Canva and for a couple other authors too.
These days if there is trouble with a cover, it’s probably a KDP Print glitch. Their POD printers are overworked and underpaid just like all of us these days and I’ve heard reports of covers not printing well, interiors that are crooked, pages falling out of the binding, and even text of other books inside yours. That is a KDP Print problem, not a Canva problem. The only issue I’ve ever encountered doing a paperback wrap in Canva is that IngramSpark requires a CMYK color file while Canva saves in RGB as does GIMP. IngramSpark will still accept your file, but they warn you the coloring in the cover might be off. If this is truly a concern of yours, don’t use Canva for a full wrap. Learn PhotoShop or hire out. I publish with IngramSpark and in a blog post from a couple years ago, I compared the books from IngramSpark and KDP Print. While everyone insists IngramSpark prints with better quality, I did not find that to be the case, and Canva had nothing to do with it.
That being said, there are a couple things you need to know before you do a full wrap in Canva.
Your stock photo must be in 300 dpi. I buy my photos from Deposit Photos, and lately when I download a photo, the image size is huge but the dpi is only 72. You have to fix this or your cover will come out pixelated and you won’t know why. You can download GIMP for free and use the SCALE IMAGE (under Image in the menu) to fix this, or if you already have Photoshop, adjust the dpi and save. That is the photo version you want to upload into Canva.

This is the screenshot from a photo I used to make a mock cover the other day. You can see that the dpi is only 72. And if you take a look at the width and height, sometimes that is too huge for Canva to accept and they’ll ask you to fix the size. The width and the height doesn’t matter so much, and you can change the width to a lower number. This is a horizontal photo and I chose 3000 for the width. Press Enter and it will automatically resize the height. With the DPI set to 300, export it as a jpg or png, it doesn’t matter, Canva accepts both. (If I’ve lost you on this step, you’ll have to do your own digging. I rarely use GIMP and this post is by no means a tutorial on how to use it, because yeah, I don’t know how to do very much.)
You have to have your interior already formatted for paperback. That includes the front and back matter, the font you chose, gutters and margins and all the rest. Unless you want to play, it’s helpful if this is the final version of your paperback interior. It’s already been through betas and your editor. It should be ready to publish. If it’s not, you can experiment with your cover for practice, but you need the final number of pages for your spine’s width. KDP Print gives you ten pages of wiggle room. That’s not much and more often than not, they’ll make you resize your cover using an updated template.
Choose the trim size you want and page color you want. I see this question all the time in the FB groups, and most say it doesn’t matter. It doesn’t matter. Though if you’re concerned with printing costs, the more pages you have–250+–the larger the trim size you want (6×9 is best) because more pages means higher printing cost. My novels run anywhere between 70k to 90k and the only thing that I use as a yardstick is this: My series books are 5×8. My standalones are 5.5×8.5. I don’t know why I do this, but it’s a system I’ve fallen into. If you write epic fantasy and your books are 400 pages, choose the 6×9.

This is one of Lindsay Buroker’s epic fantasies. Amazon makes it easy for you to check out what other authors in your genre are doing. You can see that this book is 528 printed pages and she chose a 6×9 trim size. Her spine is 1.32 inches. It’s a thick book. When you publish and set your prices, KDP Print will offer you a royalty calculator and you can price your book based on the royalties you’ll make when you sell a paperback. Price too high and you won’t get many takers. Price too low and you won’t make anything on the sale. Try to find a happy medium and fit in with what other authors in your genre are doing.
As for the color, I always choose cream for fiction. Seems the standard is cream for fiction, white for nonfiction. There may be exceptions, but that’s what I go with.
When you have the number of pages from the formatted file, know your trim size and page color, you can Google KDP paperback templates.

This is only for paperback. As of this writing, they are rolling out a hardcover option. It’s in beta right now, but offering a hardcover is what you’ll need to decide based on your business goals. I write romance and I focus my marketing on readers in Kindle Unlimited. A hardcover edition of my book doesn’t interest me, and if I ever wasted the time to create one, it would be for vanity purposes only.
Download the template. It will come in a ZIP file. Open it up and save the PNG as a name you’ll be able to find later. You can’t upload a PDF into Canva, only download, so the PNG is the one you’ll want.
Now it’s time to do some math.
When you want to do a full wrap in Canva, you need to know the canvas size. This is where I think a lot of people get tripped up. How do you figure out the size of the canvas so your template will fit? Your canvas size has to be the size of your book’s trim, plus spine width, plus the bleed. These numbers will change based on the trim size you choose for your books and the spine size. You won’t be able to use the same canvas size over and over unless you choose the same trim size AND your book is the same number of pages every time. That’s going to be highly unlikely, so it’s best just to realize you’re going to need to learn how to do the math.
We’ll start with the template:
The template will tell you how wide your spine is. You need this for the math. There is another way to figure out spine if you don’t download the template first, but this is the easiest way so no use giving you more math.
Then this is how you figure out the size of the canvas:
For the width of the canvas: The width of the back cover plus bleed, plus spine, plus the width of the front cover plus bleed.
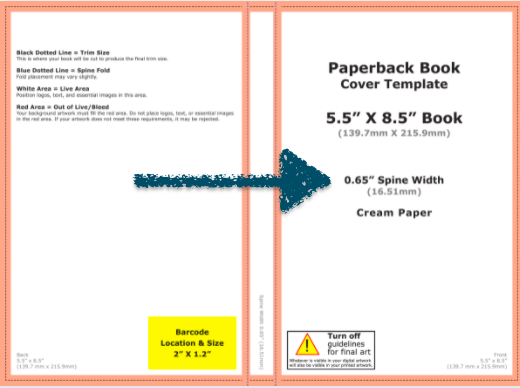
If we use the template above as an example, the template is 5.5 x 8.5. This is what we add together:
5.5 (back cover) + .125 (bleed) + .65 (spine) + 5.5 (front cover) + .125 (bleed) = 11.90 inches.
That is the inch width you put into the custom dimensions box in Canva. The default is pixels, you’ll need to change it to inches.


If you need to see it in a different way, I made this for a friend:

The height of the book is 8.5 + the bleed .25 = 8.75. This is the number you put into the height box in the custom dimensions.

Hit enter or click on Create New Design and you have the canvas for a 5.5x 8.5 sized book with a .65 spine. It might not look like much, but now you can upload the PNG of your template and put that into the canvas.

It will take a little moving around, but keep as much orange as possible because that’s your bleed line. Anything on the orange or beyond has a chance of getting cut off in printing. The spine guidelines keep your text from bring printed on the front or back covers. Make sure the template covers the entire canvas.
You might have noticed I didn’t tell you your template needs to be at 300 dpi, and it doesn’t. You’ll be building your cover on top of this template and you won’t see it at all when your book is printed.
When I say that you’ll be building your cover on top of this, I mean you’ll be putting the stock photo and all the text on top of the template. What you use for your front cover and the back cover is going to be up to you. Some authors use a horizontal photo like the woman on the dock above and use it to create a full wrap from the one photo, like this:


You can see I flipped her and used a filter, but I used the whole photo for a full cover wrap. I built it on top of the template using the transparency feature and it looks like this:

Using the bleed lines, you can put the font where it needs to go. It’s not perfect–the author name isn’t centered and can come down more. When you’re done with the bleed lines, change the transparency of the photo back to 0 and this is what you’ll download. Download the file in print-ready PDF for your KDP dashboard when you upload your files for publishing.
Lots of people say they don’t know what to put on the back of their covers. The sky is the limit, really, from just the blurb to reviews of the book to your author photo. I’ve only done my author photo once, and that was for the back of All of Nothing:

The only thing I would caution you on is you don’t need to make the blurb font huge. It was one of my mistakes first starting out. And if you don’t want to put a white box for the bar code, you don’t have to. KDP Print will add it when they print your cover. Google for more full wrap ideas.
For the woman on the dock, I blew up the part of the water giving the back cover a grainy texture that matched the photo but some authors like the full photo wrap. It keeps them from. having to worry about getting the bleed lines on the spine perfect for printing. POD printing isn’t an exact science anyway, so chances are even if your PDF is perfect, the spine will be a little off. No matter how centered my title and author name are, almost 100% of the time they won’t be centered on the spine when you order a copy. Now that I’ve done it both ways, I think I prefer the full photo wrap.


I added a white gradient (that you can find in Canva) to the bottom to white out the dock a little bit making Penny’s name more readable. When it comes to cover design you know your own abilities. I’ve often said I’m lucky I write romance and can find a cute couple and slap some text over them and call it good. It’s not that simple, obviously, but if I wrote in epic fantasy, or even thriller, I would have to hire out. I’m not interested in learning beyond what I know. I’m a writer, not a graphic designer.
Developing an eye for book covers takes time and a lot of practice. Sometimes what you think looks good on the screen won’t translate well to a printed cover at all and you’ll be back to the drawing board. If you’re tackling book covers for the first time, you may be investing in some proof copies just to see how your work looks printed. If your business model makes paperbacks important, then you’ll put a lot of time into learning how to make your paperbacks look amazing. Like I said before, my business model centers around KU readers and it’s more important to make sure my cover grabs attention at thumbnail size and indicates to readers the second they look at it what genre it is.
It might seem like I skimmed over the most important part: the math. We can do another book with a different trim size just for practice.
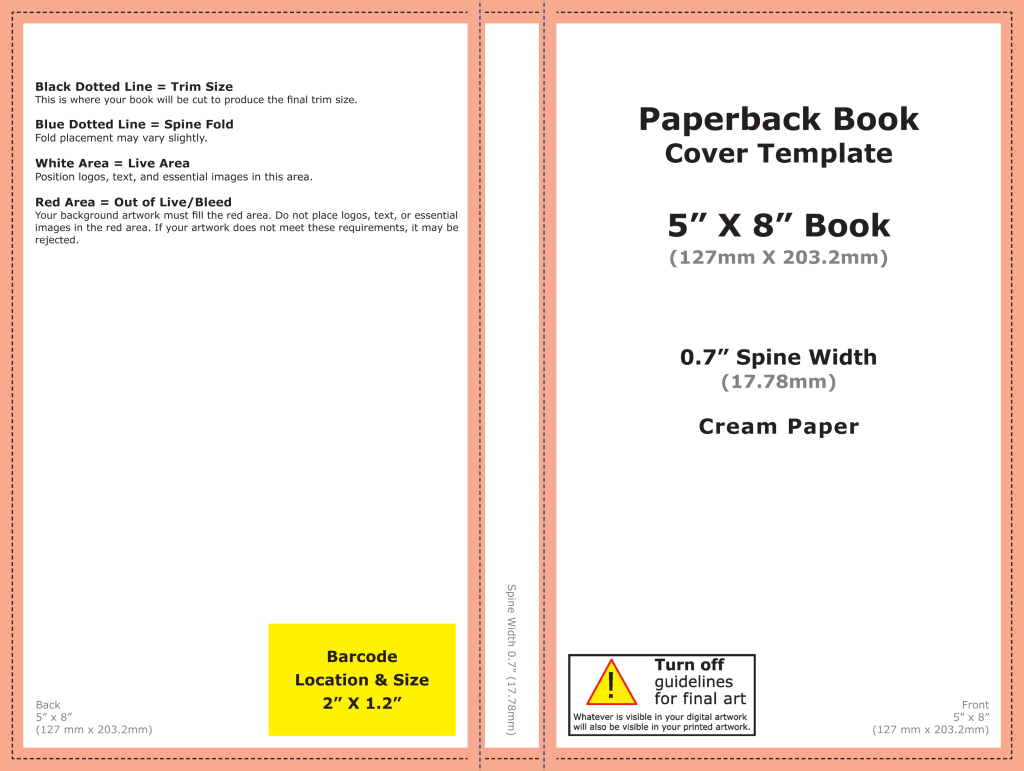
This is the template the first book in my Rocky Point Wedding series. The trim is 5×8 and the spine is .70 inches. If we do the math for the Canva canvas it would look like this:
5.0 (back cover) + .125 (bleed) + .70 (spine) + 5.0 (front cover) + .125 (bleed) = 10.95. That is the width you would need to put into the custom box.
The height would be 8.0 (cover) + .25 (bleed) = 8.25. That is the height you would put into the custom dimensions box.
This is the cover I did for the first book in the series:

I did most of it in Canva, though I added some transparent gradient in GIMP for blending the two photos. Everything I know I taught myself, and it’s not fair i’m trying to shove four years of practicing and learning into one blog post. You’ll have to do your own experimenting.
Some odds and ends I picked up on the way:
Don’t buy a bar code. You don’t need one. KDP Print and IngramSpark will generate one for you. I buy my own ISBNs though, and that will be a choice you need to make if you’re in the States and expected to pay god-awful prices.
Don’t use free photos from Unsplash, Pixabay, Pexels, et al. Cover your butt and secure your business and use photos that you pay for from trusted sites like Shutterstock or Deposit Photos. Same with fonts. Not everything is available for commercial use. Be careful.
Use caution when choosing the models on your covers if you write romance. Amazon has gotten very picky lately, and the cover for His Frozen Heart disqualifies me from being able to run ads on Amazon Advertising to that series. Needless to say, that sucks.
You can use the same canvas size for an IngramSpark template. The one difference between an IS template and a KDP Print template is the spine for IS is narrower. The only adjustment you’ll be making is your font size for your title and author name on the spine will be smaller.
Elements (font, symbols ) can shift when you download your PDF and they will look “off” when you upload to KDP. I haven’t found a solution for this except to overcorrect, save, and re-download so the elements are in the place they are supposed to be. When you download the PDF, check the file before uploading to KDP. You’ll see if anything has shifted and you can correct it. The KDP Print previewer will show you exactly how your book cover and interior will print. If you don’t like ANYTHING in the previewer, fix it because printing won’t change it.
There are videos on how to create a full cover wrap in Canva–and you might find them helpful–but the few I’ve watched leave out important steps like making sure your photo is 300 dpi. This is going to take some trial and error. I remember being soooo nervous waiting to see if the cover for Wherever He Goes was going to look good.
I think that’s all I have. I know it seems like a lot of information, but blogs and videos won’t take the place of practice. If you have any questions, leave me a comment. I’ll answer to the best of my ability. If you’re making covers with my tips, tweet me at @V_Rheault on Twitter. I want to see what you’re doing.
Thanks for reading!
Until next time!
Resources I’ve found helpful:
IngramSpark’s File Creation Guide
KDP Print’s template generator
IngramSpark’s template generator


Thanks. I’ll give that a go. If you’re not confident with maths you can open the pdf version of the template and go into File/Properties. Among other things, it will give you the page size.
LikeLiked by 1 person
Thanks, Cathy! Yes! That is another way to grab the dimensions, and I didn’t know you could do that either, until I watched a couple of YouTube videos on where to look. Thanks for pointing that out!
LikeLiked by 1 person
Love this. How very helpful. Thank you!
LikeLiked by 1 person
Glad I could help, Melissa! Thanks for reading!
LikeLike
Thus is great, Vania! I’ll give it a go. Thanks for the screen grab examples!
LikeLiked by 1 person
I hope you find it useful! Canva is so easy to use.
LikeLiked by 1 person
I’ve been a Canva user for a couple of years, using it for creating basic images. But seeing some of the things others are doing, I definitely need to get with the program 😀
LikeLiked by 1 person
There’s a Canva FB group, and the things they come up with are crazy good. Nothing we could use for book covers, but they show how versatile Canva can really be. Thanks for reading!
LikeLiked by 1 person
The very first paperback cover I made for my debut, I did a lot of trial and error. I’m actually surprised how your cover turned out – it covered the entire canvas! I had to open a canvas much larger than my dimensions (i had downloaded the template by KDP) and at the bottom centre, place a mini version of the three parts of my cover (front, spine, and back). It took A LOT of trial and error, before I was happy. 😂
I’ll try out your way, too, once I’m done with this family function I’m stuck in. 😁 Thanks so much!
LikeLiked by 1 person
I hope it works for you! I’ve done several covers this way, and they’ve all turned out great! I should have posted some real life photos of the covers, but I haven’t ordered an author copy since before COVID and I don’t know where my proofs are.
LikeLiked by 1 person
Pingback: Monday Musings: Is Publishing Your Book like Letting a Bird Fly Free? | Vania Margene Rheault
Pingback: Monday Musings, Fear of Success, and Where I’m at Now. | Vania Margene Rheault
From a design perspective, and someone who uses Canva every day, this is a very detailed and well-explained post about how to create your own book covers. I pinned it to my personal Pinterest account for future use. Thanks, Vania.
LikeLiked by 1 person
Thanks, Tracey! I appreciate you taking the time to read and comment. I just wanted to double check if it was clear, and you would know! Thanks for commenting. 🙂
LikeLike
This is the best instructions I have found to help with this – all the other videos were a waste of my time. They left out the most important step of all – Thank you a million times!!!!!!
LikeLiked by 1 person
You’re welcome! I hope it helps a lot of people! Thanks for reading and commenting. 🙂
LikeLike
Pingback: Thursday author update and lessons I’ve learned rereading old work. | Vania Margene Rheault
Hello Vania, I can’t thank you enough. The designer sent me the cover for my book but it was too small, thanks to this post I was able to upscale it in Canva in a few minutes. Works like a charm.
Best, Valentina.
LikeLiked by 1 person
I’m so happy for you! Congrats on your book, too! Good luck!
LikeLike
Pingback: Updated! Creating a full wrap paperback book cover using Canva (plus more screenshots!) | Vania Margene Rheault
Pingback: My Year-End Recap and What’s Ahead in 2023 | Vania Margene Rheault
Pingback: How “Self” is Self-Publishing? | Vania Margene Rheault