
This blog post is archived. I use the measurements to create the canvas size you need for your book’s template in Canva. Canva is a much better way to make book covers than Word, but (crazy enough) I hadn’t heard of Canva yet, and was doing book covers the hard way. Thank you. VMR
This blog post is only going to consist of the directions on how to make your cover template using Word. I know many of you will drop off after you get it, and that’s cool. You just want the formula for those sweet text boxes, and I understand that completely. So without further ado . . .
Before we go into creating a new Word file, you need to have some numbers handy:
First, your spine width. We already have that figured out, right? (Running to Love’s was .64″.)
Second, what is the trim size of your book? Did you decide 5×8, 6×9? We need it to calculate the size for the Page Layout:
(Width of trim size x 2) + spine width = Width of cover trim size
I would choose 5×8, so Running to Love’s Width would be 5×2+.64, so 10+.64= 10.64
(What you are doing is adding the width of the back cover, the width of the spine, the width of the front cover.)
Height of your trim size = Height of cover
Running to Love’s would be 8.
Add .25 to both: (These are the measurements you’ll need for Step One, below.)
Width ( 10.64 + .25 = 10.89 )
and Height ( 8 + .25 = 8.25 )
This is for bleed so that your images are going all the way to the edge of the cover. Make sure your text is not near the edge of the text boxes or it will be in the bleed area and may get cut off during printing.

Keep your text out of the red areas. The template you’re making won’t have the red areas, so you’ll have to guess.
Now that you have the dimensions you’ll need I’ll type out the instructions.
Open a new Word Document. (I’m using Office 365.)
Please remember to save often.
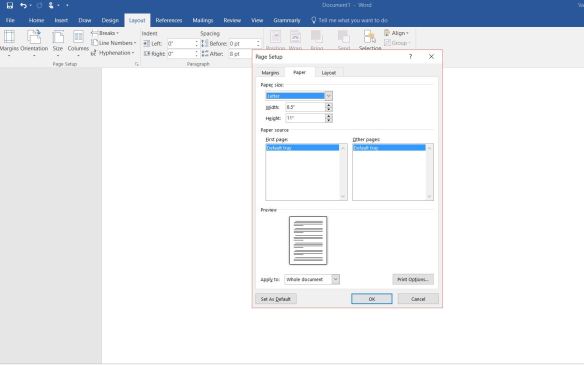
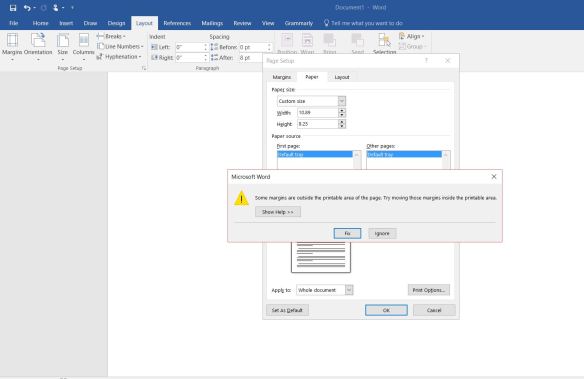
1. Set the paper size in the Page Setup Menu in Layout. In Page Setup, choose more Page Sizes at the bottom of the list, and enter the width and height for your cover file. Ignore the error message if you get one.
2. In the Layout Menu under the Page Setup tab, set Margins (choose custom margins at the bottom of the menu) to 0. I didn’t get an error message, but I’m using Office 365. Just ignore it if you get one.
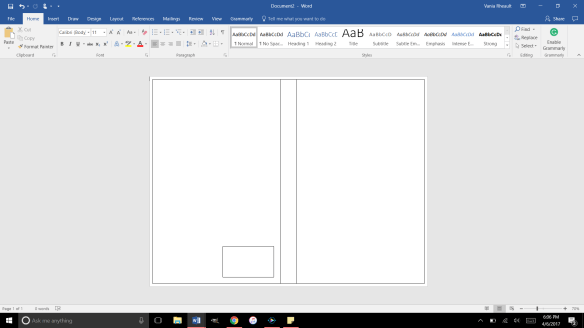
3. Under the Insert Tab, choose Text Box, and make one text box. Change the dimensions to the cover of your book: 5×8, 6×9, etc. This will be your front cover.

4. Insert another text box that will be the spine. Use the width you calculated, and the height is the same.

5. Insert another text box that will be the back cover:

If they don’t fit, move them around. The lines of the right side of the back cover and the left side of the spine will overlap to look like one line. The same with the right side of the spine and the left side of the front cover. If your mouse isn’t accurate, or your hand is shaky, use the arrow keys on your keyboard.

It’s very important that you move these boxes, not stretch them so they touch–that changes their size and will distort your cover.
6. Add a barcode box. A quick search says they are: width 2″ and height 1.2″ The template above also has the dimensions in the yellow barcode box. Use a small .25″ x .25″ to place the barcode box, then delete it. Zoom in so you are accurate. You don’t want to have CreateSpace move it because that might mess up what you’ve got going on back there. They may not even move it, they may just tell you to redo it. Let’s not find out.

So this is the finished product. Keep copies of it everywhere because you’ll be able to use it for other books. You’ll need to change the Page Layout dimensions to change the spine because your books won’t all the be the same length, and the front and back text box dimensions, if you change your trim size. There is a bit of math involved, but please remember to have a finished and formatted manuscript before you do any of that.
I think that’s it.
The next blog post will be about inserting a picture on the front cover. I’ve been on the lookout for a while for covers that simply use a picture with text on top of it for title and Author’s name. Surprisingly, you can make some very pretty covers. 🙂
Discover more from Vania Margene Rheault
Subscribe to get the latest posts sent to your email.

